Tuesday, September 29, 2009

It's in the can

Whether it's what's on sale or the result of trying to pick hearty fall dishes, lately I seem to have pulled a lot of recipes involving canned tomatoes. I'm kicking myself a bit, because my tomato plants seem to be giving one last hurrah and last week I got several fresh fruits off the vine. But we used them right away -- as we should have, really, and they were good -- and here I am making another sauce thinking, "I wish I had enough real tomatoes to do this from scratch."


Next summer, I keep telling myself, next summer I will have more tomato plants and enough ripe ones at one time to make sauce.

But it is no longer summer, and I used canned tomatoes to make a chicken cacciatore.

I've been meaning to make this for about three weeks, actually, but kept forgetting to take the chicken out to defrost. I hate using the microwave to defrost things. The food never thaws evenly and you have some bits that are cooked while the rest is still rock-solid.


Yesterday, I remembered to take the chicken breasts out and let them thaw in the fridge. So when I took the meat out 24 hours later and found it covered in ice crystals and solid enough to break a tempered glass cutting board, I was more than a little irritable.

While it defrosted, unevenly, in the microwave, I did the rest of the prep work. The recipe said to dice the bell pepper. I chopped more than diced, but I liked the big pieces. I skipped over the part about fennel seed, it being one of those spices I don't use often enough to justify buying at this point in time. And, while Will and I like spicy food, the kids are still on the fence about it, so I used only a (generous) pinch of red pepper flakes instead of the full 1/2 teaspoon in the sauce, and left the jar out for adults to season their food as they wished.


The chicken browned nicely, although it seemed like too much oil was in the pan. I removed the chicken, added the pepper and herbs as directed and stirred them around. Then I poured in the tomatoes, wine and vinegar and the sauce smelled fantastic. I couldn't wait to try it. At this point, I realized the pasta water had finally come to a boil, so I let the sauce simmer while I dumped the spaghetti into the pasta pot.

I returned the chicken returned to the pan to cook through, which took about the same amount of time as the pasta. Again, the food smelled great, and it looked pretty good, too.


THE VERDICT: The sauce was decent enough, but didn't wow me as much as I thought it would based on its fragrance, and the chicken was a little dry. Will liked the sauce, going back for seconds, but thought the chicken was almost surplus. Keith and Alex said it was good, and they ate it. An on-the-fence recipe.

Saturday, September 26, 2009

Ambition, 1.0

While sorting recipes Sunday afternoon, I came across one for homemade ricotta. It was ridiculously easy: Heat a lot of milk, add some lemon juice, heat some more, skim out and drain the curds, voila!

Then, while trying to recall what I did with a particular homemade yogurt recipe, I found a different set of directions for homemade ricotta, this time using buttermilk. And I found another one in a back issue of another cooking magazine.They all promised simplicity and better-than-storebought taste. And the first recipe was linked to one for ricotta gnocchi, and what could be more inspiring than homemade gnocchi from homemade ricotta?

That first recipe said I would need to make a double-batch to have enough ricotta for the gnocchi. So I poured a gallon of whole milk and some salt into a stockpot, and set it over medium-high heat. It took forever to come to a simmer, but finally I was able to pour in the lemon juice.

Curds started to form almost immediately, and I was duly impressed. That is, until I realized that even simmering for the full two minutes wasn't going to produce quite as many curds as I expected. I skimmed them all out and drained them, and had maybe a cup of ricotta, not the 3 cups the recipe promised.


Where did I go wrong? Did I use too much milk to start with? Was the milk hot enough? Was it too hot?
I decided to jog back to the grocery store and try again, this time with a single batch. The same results -- I got only one-third of what I was supposed to.


Now, don't get me wrong. The little bit I got was pretty tasty, although somewhat more lemony than I'm used to. (Maybe the problem is my bottled lemon juice shortcut?) However, this method seems to be a colossal waste of milk for such a small yield.

That is, unless you plan to use the leftover milk in your tub...

Wednesday, September 23, 2009

Short-order cooking

Thorough disclaimer: I did not cook this recipe. I got stuck in traffic (read: had to stop and buy coffee beans) and my husband got home well before me, so he kindly consented to make the dinner I had planned.

I had picked a penne with bacon, tomato and cheese sauce, largely because it looked like it could be made in 25 minutes, give or take a few. It did take a fairly short time, making it good for busy weeknights. We used turkey bacon, which didn't quite yield the 4 Tbsp. pan drippings the recipe called for, so we threw in a little olive oil.

We ran into a little snag when we tried to open the red wine: Our corkscrew mysteriously disappeared. I was just starting to gauge whether our kitchen scissors would fit in the cork when my husband remembered the never-used wine picnic tote I got a decade ago at a holiday party at work. Like my recipe collection, it's one of those things I just can't part with because someday, we might actually get a babysitter and go do the loaf of bread, jug of wine thing. Anyway, the tote also comes with a handy portable corkscrew, and I knew exactly where to find it.


THE VERDICT: It was a pretty fast cooking recipe, as I suspected. The sauce was tasty enough -- we used Parmesan for the cheese, incidentally -- although a little on the thin side. But as my husband pointed out, he cooked more penne than the recipe called for, so that may have had something to do with it. The bacon added a little variety to an otherwise straightforward sauce. Worth making again, perhaps with a smokier cheese.

Monday, September 21, 2009

The best-laid plans

As part of my recipe-weeding effort, I'm trying to get in the habit of planning out each week's menus and matching dishes to whatever is on sale at the grocery store and the feasibility of cooking on busy school nights. This turns out to be harder than I would have figured.

To wit: Chuck roast was on sale this week. If I have a recipe that involves chuck roast, it's lost in the black hole that I call my entree binder. Meanwhile, I have about 40 sirloin recipes needing testing, but at full price, steak was not in the budget this week. Pork tenderloin was on sale, and a little shuffling and flipping later, I came up with a maple-glazed pork that looked like it was worth trying.


Butternut squash also happened to be on sale, and I jumped for it. Butternut squash is an anomaly in our household, being one of the few (perhaps the only) vegetables that I eat and nobody else does. Usually it's the other way around; I have an intolerance/allergy to the cruciferous group, which rules out an amazing number of green things. Some red and brown ones, too. But squash is OK in my book, especially with butter and brown sugar.

So I had a butternut squash and a goal: to flavor it enough that the boys will eat it. All three of them.

I wasn't in the mood to dig through more binders, so I went to epicurious.com, a.k.a. Bon Appetit online, and ran a search until I found something I liked. It just so happens Bon Appetit was the source of both recipes: pork tenderloin with maple glaze and 
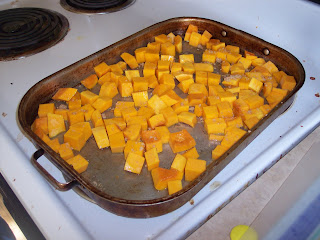
roasted butternut squash with brown butter and nutmeg.

I have to say, I'm a little proud of my pre-planning. First, I decided to peel, seed and chop the squash ahead of time so I wouldn't be scrambling at 5:30 p.m. I also actually thought to read through the pork recipe -- OK, I just wanted to see if I could roast it and the squash at the same temperature -- and discovered that I'm supposed to cook the thing in a covered skillet on the stove top. So now I knew I might want to halve the tenderloin to fit neatly in the skillet instead of trying to shove the whole thing into a too-small pan in one piece, and probably burn myself again with hot olive oil.

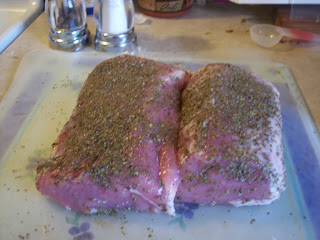
The next dilemma was seasoning. The pork recipe called for dried sage, we didn't have any in the house, and buying a new jar was cost-prohibitive. (The back-to-school shopping bill just came in. Right now, ramen noodles are cost-prohibitive.) I decided to substitute dried savory, which I was pretty sure was tucked away in the cupboard somewhere. It turned out I was wrong. There was no dried savory, nor thyme. What we did have, however, is about a quart of marjoram courtesy of some craziness in a spice order some time ago. Problem solved.

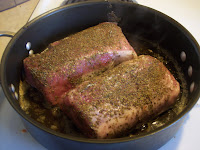
After reading through the recipes carefully, it appeared I needed to start the squash first, then the pork and some boiled rice on the side at the same time. All seemed to be going well; I even got the pork in the skillet without anything spitting at me. Then I realized I forgot to start the timer on the squash and had to keep a really close eye on it. Then I realized I set up the coffee pot for a late afternoon pick-me-up and forgot to press the start button. 

The squash finished roasting first and I started melting the butter to toss with it. The rice finished cooking a minute later. The pork took forever. As it turned out, so did the brown butter. It melted quickly, but did not turn nut brown. I checked the pork. I checked the butter. I checked the pork. Finally, it was done. I removed it to a plate, deglazed the pan... and remembered the butter. It was now a darker brown than I was aiming for, but fortunately, not burned.


I tossed the butter and nutmeg on the squash along with a hefty sprinkling of brown sugar. My oldest wandered by and said, "Oh boy! Peaches with brown sugar." I hated to disillusion him. A minute later my youngest came in and said, "Oh no! I don't like squash!" I thought briefly about telling him, "No, honey, they're peaches." But I refrained.


THE VERDICT:
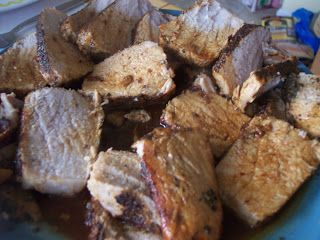
The pork was pretty good, but a little too much trouble to make on a regular basis. My husband said it reminded him in a good way of pork sausage. The maple flavor didn't come through that strongly to me, but the sauce was still tasty. The boys were OK with it.

As I expected, I really liked the squash, especially the browned butter. I thought the texture was great -- not too firm, not mushy. My husband didn't like the texture and would have liked it a little softer. He also called the spicing "subtle," a.k.a., he didn't notice it. My oldest didn't like the flavor but ate it without complaining. My youngest complained vehemently about having to eat squash and refused to finish it. I'll keep the recipe, but it may not get used frequently.

Friday, September 18, 2009

Making it up as I go along

One of the many differences between my husband and myself is he is a much more flexible cook than I am. He can come home from work and throw something together; when I try to do that, the answer more likely than not is pasta, probably with a quick-and-dirty alfredo sauce. He can make up dinners without a recipe; I have to know in advance exactly what I'm making and that I have the ingredients handy.

Sometimes, though, I venture into the realm of cooking without a precise recipe. For me, these are baby steps, starting with something I have a general idea about and may even have made before, and then tweaking it here and there. Something like lasagna.

Making lasagna is kind of the reverse of my binder-clearing project; instead of trying out different published recipes, I'm trying to create something worth writing down. Sure, I can make a decent lasagna using the recipe on the back of the pasta box, but the top layer is always too tough and jarred sauces never do it for me. So I want to make up my own.


My basic sauce recipe originally came from a friend, who also made it up as she went along. I started by sauteing a couple of pressed garlic cloves in a little olive oil. If I were making a strict pasta sauce, I would use three or four cloves. In a lasagna, however, I don't want the garlic to be overwhelming.

I put in some tomato paste and a large can of tomato sauce. I don't know why working from canned tomato sauce tastes better to me than using a jar of the stuff, but it does. I dream of getting enough tomatoes out of my meager garden to make sauce entirely from scratch, a dream deferred until next summer.

I like the flavor onions give to sauces, but I don't like the taste or texture of onions themselves and picking them out of my lasagna is not an option. To get around it, I dropped a tablespoon of granulated onion bits into the sauce. Next I added whatever herbs were handy, in this case, fresh oregano, rosemary and basil, a pinch of dried marjoram and two bay leaves. Normally at this point I also slosh in some red wine, but I didn't have it handy so I went without. Last, I tossed in a chunk of Parmesan cheese, and simmered on low for a while.


Meanwhile, I browned some sausages, another tip I got from a friend, and set them aside. I started the pasta. After confirming the milk in the fridge was still good, I went to work on a bechamel sauce. Finally, I threw some ricotta, grated mozzarella, Parmesan and a couple of eggs into a bowl and mixed it all together.


I started layering with some bechamel, a little tomato sauce, noodles, cheese, sausage, tomato sauce, noodles... two things quickly became obvious. One, I needed a lot more sausage than I had. Two, it probably wouldn't have hurt to mix it in with some of the tomato sauce. I skipped the sausage on the middle layer to save it for the top. After laying down the last of the noodles, I topped it with the rest of the bechamel and copious amounts of finely shredded mozzarella. And baked it.


VERDICT: The result was one fine-looking lasagne. It was pretty good, although a lot cheesier and less meaty than I would like; next time I scale back on the ricotta and double the sausage. The top layer of noodles wasn't too tough or overcooked. My husband was skeptical of the use of bechamel at first, but liked it after he tried it. The boys ate seconds. We're getting closer.

Thursday, September 17, 2009

A family affair

One of the challenges of my attack on my recipe collection is working around the family schedule. Two working adults, two busy school-aged boys -- thousands of families have the same problem.

Sometimes I break down and dinner looks like this:


This usually happens on Wednesdays, when soccer practice starts the same time I would otherwise be telling the boys to set the table. I'm not proud, but I am human.

Thursdays are a little different. Soccer practice ends just before dinner time -- I make sure of that, I'm the coach that night -- and I generally employ one of two methods to get the kids fed. One is to delegate the responsibility to my husband. I'm very fond of this method, and use it regularly. He's a pretty good cook himself, and unlike me, is capable of figuring out what to make on the spur of the moment and making it something other than pasta.

The other method is the good old slow cooker, which is what I used today, although with a little help from my spouse. My husband picked the recipe, for red-cooked rump roast, out of Not Your Mother's Slow Cooker Cookbook by Beth Hensperger and Julie Kaufman. Red cooking, the cookbook explains, involves making a sauce that can be reused on other meats and gaining flavor each time.

You first prepare the red sauce, which involves soy sauce, water, and a bunch of spices. My husband kindly did this for me last night to save me the trouble this morning. Not that it looked particularly hard, but I will never quibble with anything that gives me more time to savor my morning coffee.

The sauce heats in the slow cooker for an hour before the roast is added to cook for eight hours. The rump roast, also on sale this week, looked to be much better quality than Monday's skirt steak. Still scarred from said skirt steak, I lowered the roast gently into the hot liquid... gently... gently... and SPLASH. Soy sauce and scallions all over the counter. But, no burns.

One of the great things about most slow cooker recipes is that once everything's in the pot, you can walk away until it's done. Not quite with this one. In this case, I was supposed to turn the roast after four hours. This isn't a big deal if you're home all day, which I was expecting to be at the time I agreed to make the recipe. Three hours into cooking, though, I got an emergency work call and had to bolt. So I made a slight adjustment and turned the roast just before I left.

After work, I ran the kids home to change into soccer clothes and turn the roast back to the first side. The timing worked perfectly; it was supposed to cook four hours on each side, and there was one hour left in the cooking. Plus, it smelled great and it was already fork tender.

After this, my husband took over. I had to go to a meeting after soccer, so he served the roast with some potatoes.


THE VERDICT: It smelled great. I liked the inside flavor a little better than the outside, which was unusual for me.  My husband and oldest son loved it. My youngest son was on the fence. I'd probably make it again, but possibly cook it a shorter time. It seemed pretty tender after six hours.

Further experimentation: We saved the cooking liquid, as recommended.

Tuesday, September 15, 2009

I baked a watermelon

That was the summer of 1987 – when my siblings called me “bossy,” and it didn’t occur to me to mind. That was before Windows 2.0, before Nirvana cut their first album, when I actually looked forward to high school, and I thought I’d never find a guy, period. That was the summer of “Dirty Dancing.”

I was not planning on cooking anything new today. For that matter, I wasn’t planning on cooking at all, counting on my husband to handle taco night. Nay, I planned to steer clear of the kitchen and put copious amounts of Mederma on the oil burns from yesterday.

But then news broke that Patrick Swayze died, and my teenage self is mourning.

My requisite late ‘80s Swayze crush is a fond memory, and I wanted to do something in mild tribute to his passing, something besides popping “Dirty Dancing” into my DVD player (I know it’s not the sum total of his career, but it is the only one of his films I own). Then I remembered just how old some of my recipes are and decided to foray back into the kitchen armed with something from the ancient binder.

I quickly decided on “Wipeout ‘Watermelon’ Cookies,” a dressed-up refrigerator cookie. It’s one of the oldest untested recipes I have, clipped out of Seventeen magazine in, I’m fairly certain, the summer of 1987 –the same time “Dirty Dancing” was released. The movie features the classic line, “I carried a watermelon” and there is a dancing montage set to “Wipeout.”

I just as quickly remembered that one of the reasons I never made this recipe is it requires molding the dough in an empty 1-lb. shortening can. Such a thing doesn’t exist here; I rarely use shortening for anything more than tortillas or cleaning the cast iron skillet. We did have an empty 28-oz. tomato can … that just went out to the curb for recycling. And I could hear the dull clunking of the recycling truck up the street. So I darted out in my pj’s and grabbed the can out of the bin before the truck turned the corner.

I put butter on the counter to soften, put the DVD on to watch at the same time, and got working. I mamboed to the pantry, sashayed to the mixer and yelled out movie lines from time to time. The recipe (see post below) was fairly straightforward, although experienced-cook me made some changes that 14-year-old me wouldn’t have considered. For instance, I creamed the butter and sugar together before adding the eggs to avoid overbeating. The recipe calls for coconut extract, which I’ve never used before, so I subbed in almond.

Ironically, while I was working on the last stage of the dough – tinting some of it red – the “Wipeout” scene came on. Truly, a sign these cookies were meant to be. I set the dough to chill, watched the rest of the movie, cried (again), and puttered off to do other things for a while.

What makes these watermelon cookies is that you roll the red dough in the white dough, roll that in some green sugar, slice it up to look like pieces of watermelon and stick in some chocolate chips to look like seeds. Decorating it is kind of fun. They bake up pretty nicely, too.

VERDICT: Easy to make, look cool. But the taste was pretty bland. I have yet to find a really good, flavorful refrigerator cookie recipe. The kids, of course, loved them: “Wow, these cookies look like watermelons!” But they’re really mediocre. I’ll note the design element and look for a better cookie.

Watermelon cookie recipe

The recipe is pretty simple: Beat two sticks of butter, 1 cup sugar, two eggs, 1 tsp. vanilla and ½ tsp. of coconut extract. I don’t have coconut extract, so I substituted almond. When mixture is light and fluffy, add 3 cups flour, ½ tsp. baking soda and 1 tsp. salt, which you mixed in a separate bowl. Beat until smooth. Spoon out 1 cup of dough and chill it in the fridge.

Add red food coloring to the remaining dough and mix until it’s a watermelonish color. Pack the red dough into the empty can and stick it in the freezer to chill for two hours. I lined the can first with plastic wrap to make it easier to get the dough out later.

After two hours of chilling, put the white dough on a floured board and roll it into a rectangle. Be careful: The dough is surprisingly light and warms up easily. Preheat the oven to 375 degrees. Get the red dough out of the can in one piece – it helps to remove the bottom of the can and push the dough out – and roll it up in the white dough. Adjust the white dough rectangle as needed to accomplish this. Roll the dough cylinder in a plate covered with about 2 Tbsp. of green decorating sugar. Stand the cylinder on one end and cut it in half so that you have two semi-circles (semi-cylinders?).Put these flat sides down, and cut them into 3/16” thick slices, so they look like watermelon slices. My first batch tended to be closer to ½” thick, which I think worked better in the long run.

Place the cookie slices on your baking tray and press in chocolate chips to look like seeds. Bake at 375 degrees for 8 to 10 minutes, depending on how thick the cookies are.

Monday, September 14, 2009

Out of the frying pan ...

    Skirt steak is on sale this week. I happened to find an recipe for skirt steak with balsamic sauce in one of my binders. Even better, the recipe came with side dishes: roast grape tomatoes and Parmesan polenta. It was a plan.

   When my 5-year-old asked what we were having for dinner, I sent my Italian ancestors spinning in their graves by telling him it would be steak and Italian grits. Last week, my son announced he does not eat "that yellow stuff" when it is baked, broiled or grilled. I've never made soft polenta. He likes grits. So I lied.

   This was a steak that did not want to be cooked. The steak did not want to come out of the package. It did not want to be cut into two pieces to fit in the skillet. It fought me all the way to the, by now, much too hot skillet and spat oil at me when I put it in. It continued spitting oil through the splatter guard, even when I reduced the heat to low. When I went to check for doneness, I discovered the thicker half of the steak was in fact a large, long piece neatly folded over like a jelly sandwich and there was a whole side that had never touched the pan.

  I ended up slightly overcooking said steak. And when it came time to deglaze the still freakishly hot pan with balsamic vinegar, I decided to use half of what the recipe was called for -- no sense in wasting balsamic vinegar, even cheap stuff.

   The tomatoes and polenta, er, Italian grits came out fine and the kids enjoyed them. The steak was tough and the sauce was way too sweet. The adult vote was to toss it. The kid vote was in favor of Italian grits for lunch.

On recipe reduction

   I have a recipe for something called pecan pillows, essentially pecans and brown sugar wrapped in crescent roll dough and baked for 20 minutes. I've had this recipe since 1986. I've never tried it.

   The pecan pillows recipe is in an aged photo album, along with about two dozen other recipes and sundry makeup tips clipped from Seventeen magazine during my three-year subscription. Some recipes (and makeup tips) were once tried; others, like the pecan pillows and "Wipeout Watermelon Cookies" linger untested.

   Five feet from where I'm sitting, 10 years' worth of cooking magazines haphazardly fill a plastic deck chair. Some stick out of a tote bag. Others lay on the floor where they tumbled. Most of the magazines are dog-eared to mark recipes that looked good, that piqued my or my husband's interest enough that we wanted to remember and maybe, eventually, try them.

   I keep two recipe boxes in a kitchen cabinet. In one, cards of different sizes, designs and shapes are jammed so tightly I have to pull entire sections out when flipping through for ideas. Some feature the neat artist's handwriting of my mother or the tiny lettering of my husband's grandmother. Many are in my own schizophrenic hand: sometimes tall and neat, sometimes round and indecipherable, always full of abbreviations. Most of the cards were made with newspaper or magazine clippings, an index card and a glue stick. Some recipes are regular parts of my dinner repertoire; others sit there.

   The other box is earmarked for recipes that have been tested and met approval. It's easy to find recipes in there; there are only about 15.

   Then there are the binders representing last year's unfinished effort to eliminate the backlog of magazines, the cookbooks, and the terrible habit of reading the Dining & Wine section of the New York Times.

  About a month ago, I decided it was time to let some recipes go. I've decided this several times before, actually, jettisoning cards for dishes I know I'll never, ever make (anything with mayonnaise, for starters) or copying down one or two recipes before donating a cookbook to the library. But my biggest problem with clearing out a 23-year-old recipe collection is my fear of getting rid of something really good.

  This time, the plan is different. My goal is to test out at least one recipe a week and work from there. Eventually, I hope to weed out the duplicates and not-so-great dishes, get a better idea of the non-starters, and maybe, just maybe, get this cleaned up before my oldest son goes to college.